
Cheesecake Tacos

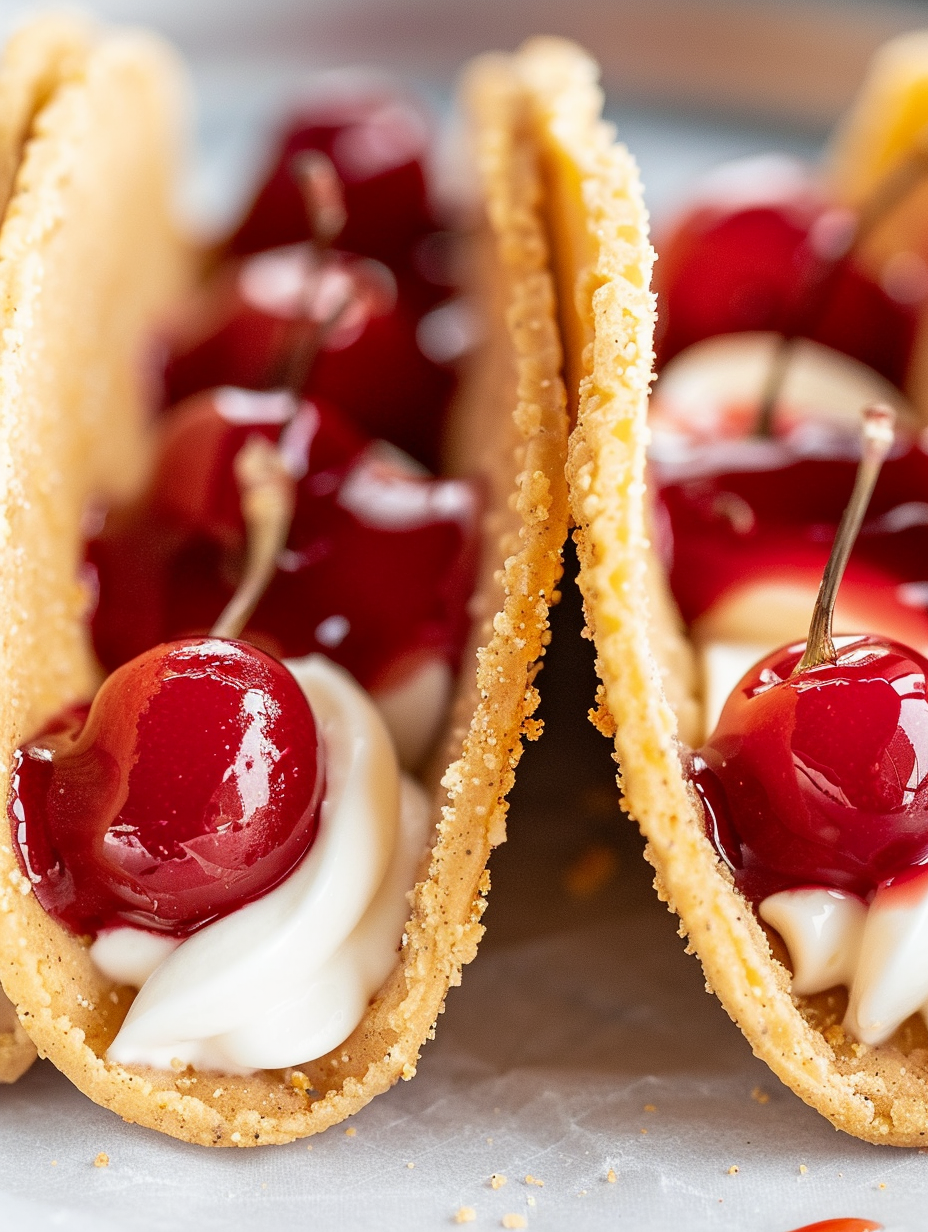
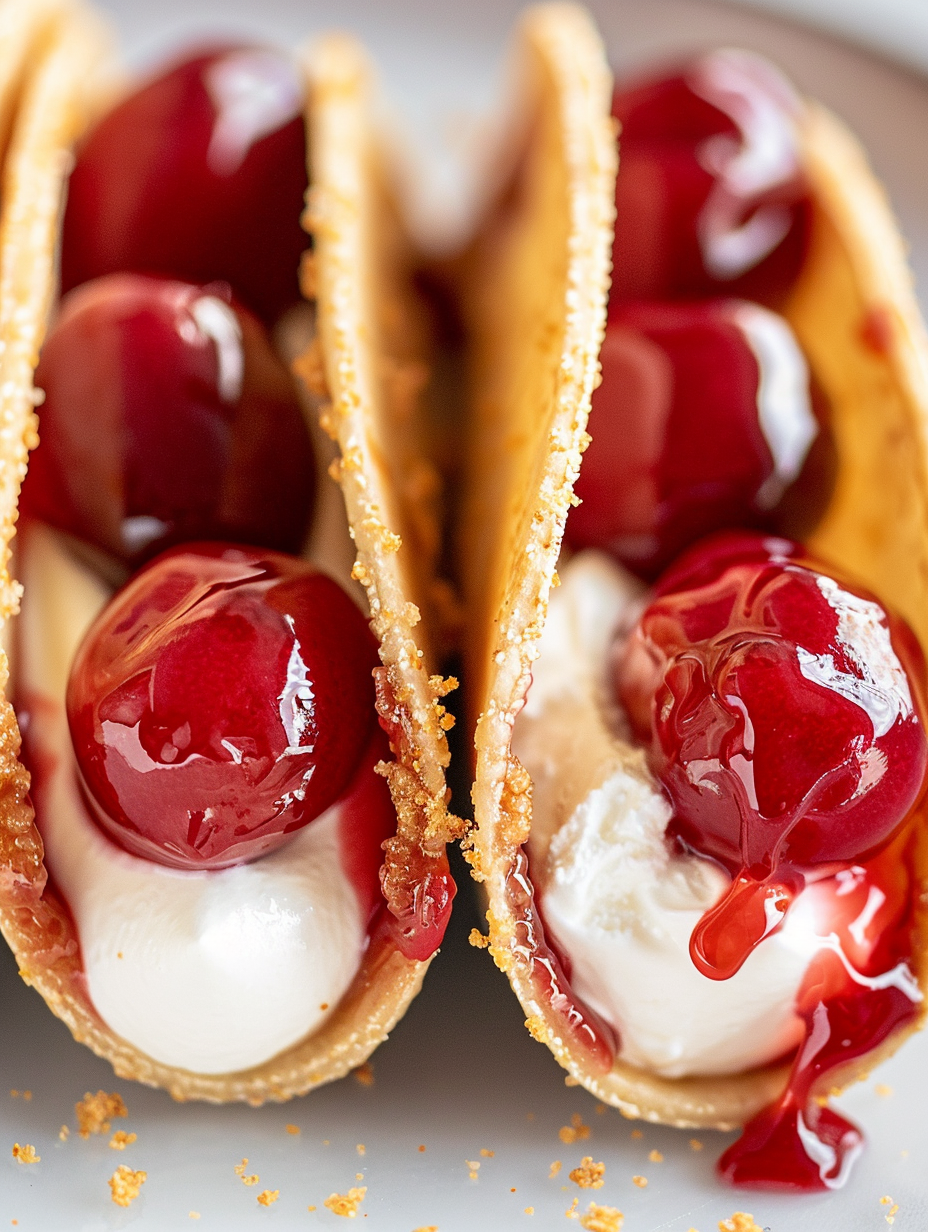
Crunchy tortilla shells coated in graham crumbs, filled with fluffy cheesecake filling and crowned with sweet cherry pie filling—an easy, crowd-pleasing dessert taco.
This dessert started as a playful late-night experiment and quickly became a weekend star for our family gatherings. I first made these cheesecake tacos one summer when I wanted an easy hand-held dessert for an impromptu backyard party. The contrast of a crisp, golden shell that crunches under a cloud-like cheesecake filling, finished with glossy cherries and syrup, turned heads and elicited delighted sighs. It feels familiar and nostalgic—like a warm graham cracker crust reinvented into a taco shell—and yet bright and modern enough to serve at a celebratory brunch or picnic.
What makes these special is how little equipment and time they require while delivering maximum flavor and texture. The shells are simply flour tortillas brushed with butter and pressed into graham cracker crumbs, then baked until they form a sturdy, crispy vessel. The filling is a silky blend of room-temperature cream cheese, a touch of powdered sugar and vanilla, lightened with whipped topping so it pipes beautifully into the shells. A spoonful of cherry pie filling on top adds the nostalgic, slightly tart finish that balances the sweet filling. These are easy to scale and perfect for feeding a crowd or making ahead in parts.
Why You'll Love This Recipe
- Crunchy shells and fluffy cheesecake filling create an irresistible textural contrast that feels indulgent but is surprisingly simple to make.
- Ready in about 25 minutes of active time; fast bake and an easy no-bake filling make it ideal for last-minute entertaining.
- Uses pantry-friendly ingredients like flour tortillas, graham cracker crumbs, and canned pie filling—perfect when fresh berries are out of season.
- Assembly is flexible: make shells and filling ahead, then fill just before serving to keep shells crisp.
- Street-taco-size tortillas create perfect single-serving portions for parties, potlucks, or dessert bars where guests want to sample several things.
- Customizable toppings let you swap cherry filling for seasonal fruit preserves, chocolate sauce, or lemon curd to suit any occasion.
In my house these vanished faster than any other dessert. My sister declared them the perfect potluck contribution because they travel well when the shells and filling are kept separate, and my kids love piping the filling into the shells like little pastry chefs. I often bring the components to family get-togethers and assemble on-site so everything stays crisp and fresh.
Ingredients
- Street-taco-size flour tortillas (18): Look for 6-inch, thin tortillas labeled street taco or soft taco size; they form crisp shells without being too thick. If unavailable, use 8-inch soft tortillas and cut to size with a round cutter.
- Graham cracker crumbs (1 cup): Finely crushed graham crackers add the classic crust flavor. Nabisco or Honey Maid work well; measure by gently packing into the cup to avoid over-measuring.
- Granulated sugar (2 tablespoons): Balances the cracker crumbs with a touch of sweetness and helps create a lightly caramelized surface when baked.
- Butter, melted (1/3 cup): Unsalted butter gives browning and crunch. Melt and brush while warm for even coating; salted works fine but reduce added salt in other adaptations.
- Cream cheese, softened (8 ounces): Philadelphia-style block cream cheese produces the smoothest, tangiest filling. Bring to room temperature so it blends without lumps.
- Powdered sugar (1/3 cup): Finely textured to sweeten without grittiness; sift if clumpy.
- Vanilla extract (2 teaspoons): Use pure vanilla for the best aromatic depth; imitation works in a pinch but the flavor won’t be as nuanced.
- Whipped topping, thawed (8 ounces): Cool Whip or store-brand whipped topping lightens the filling and makes it pipeable; for a richer version use whipped heavy cream instead.
- Cherry pie filling (21 ounces): Canned cherry pie filling provides glossy cherries and syrup for topping. Look for pie filling with whole cherries or use homemade cherry compote for seasonality.
Instructions
Prepare the oven and dry coating:Preheat the oven to 400 degrees F. In a shallow bowl combine 1 cup graham cracker crumbs and 2 tablespoons granulated sugar. Keep the mixture near your work surface so you can coat tortillas quickly while the butter is still warm.Prevent air pockets and butter the tortillas:Lightly pierce each tortilla 6 to 7 times with a fork to prevent air bubbles during baking. Using a pastry brush, coat both sides of each tortilla evenly with melted butter so the crumbs adhere and the surface browns beautifully.Crumb the shells and form shape:Gently press each buttered tortilla into the graham cracker mixture until both sides are coated. Flip and repeat, ensuring the edges are well covered so they crisp like a graham crust. Take care to press gently to maintain tortillas' flexibility for shaping.Bake in a cupcake pan for shape:Flip a standard metal cupcake pan upside down. Fold each tortilla in half and nestle it between two upside-down cups so it holds a taco shape. Bake 10–11 minutes until golden brown and crisp at the edges; watch closely after 9 minutes as ovens vary. Remove and allow shells to cool in the pan so they retain their shape.Make the filling:In a mixing bowl beat 8 ounces softened cream cheese with 1/3 cup powdered sugar and 2 teaspoons vanilla until smooth using a handheld or stand mixer. Fold in 8 ounces thawed whipped topping and beat on low until the mixture is light and fluffy. Scrape down the bowl to ensure even texture.Chill and pipe:Chill the filling at least 30 minutes so it firms slightly and holds shape when piped. Transfer to a piping bag fitted with a large round tip or use a zip-top bag with a corner snipped. Pipe the filling into each cooled shell, leaving room for topping.Top and serve:Top each filled shell with 3–4 cherries and a spoonful of syrup from the 21-ounce can of cherry pie filling. Serve immediately so shells stay crunchy. If assembling in advance, keep shells and filling separate and combine within an hour of serving.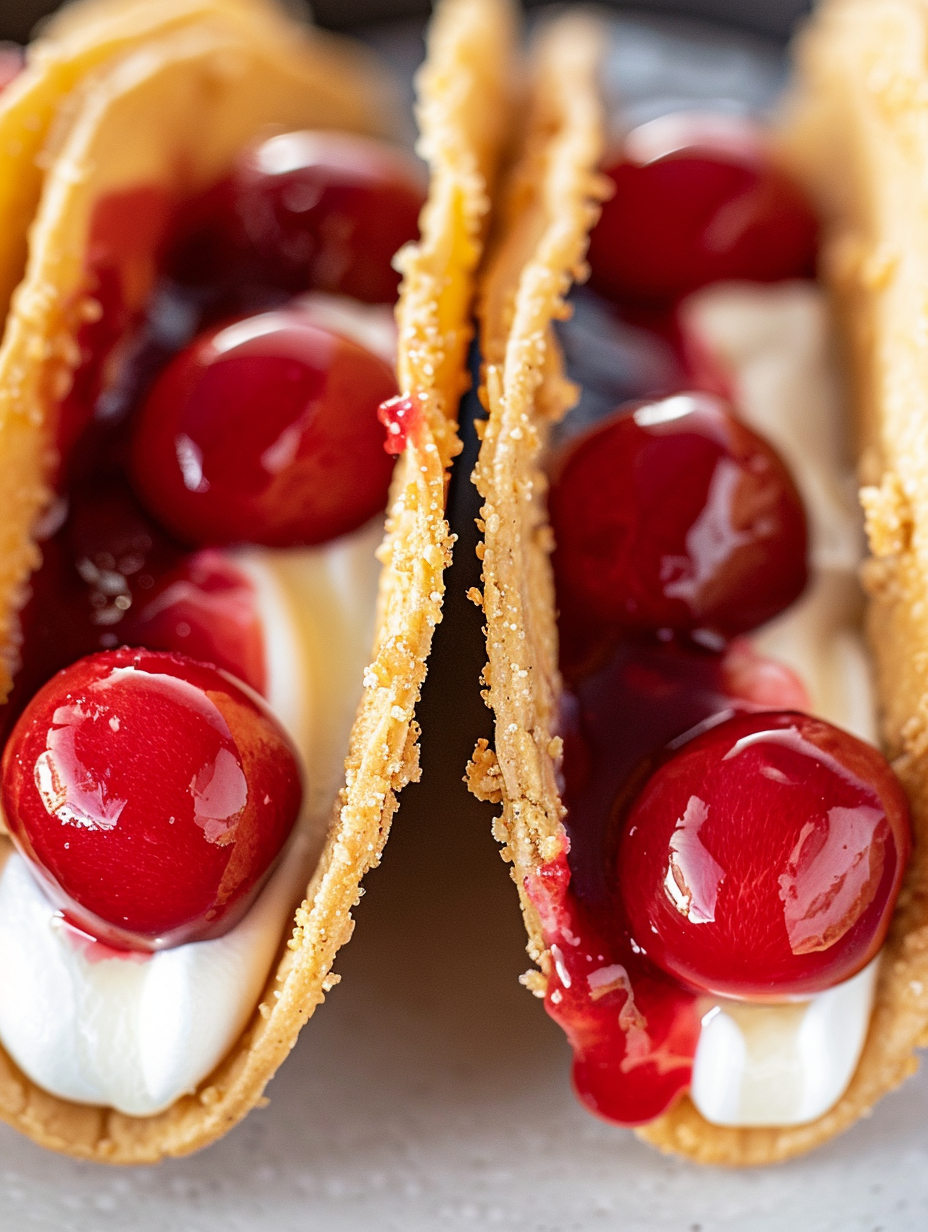
You Must Know
- Assembled tacos are best eaten immediately; assembled and refrigerated leftovers will soften the shells within a few hours.
- Shells keep airtight at room temperature for up to 48 hours; store filling separate in the refrigerator for up to 3 days.
- High in calcium and sugar—each taco is an indulgent treat rather than a low-calorie option; approximate nutrition per taco: ~260 kcal, 28 g carbs, 15 g fat, 3 g protein.
- If transporting, pack shells and filling separately and assemble on arrival to maintain crunch and presentation.
My favorite thing about this sweet snack is how versatile it is: at a summer picnic I swapped cherry topping for fresh macerated strawberries and everyone asked for the recipe. At a holiday brunch I sprinkled toasted pecans and drizzled caramel for a richer profile. The basic method is forgiving—once you master the shells and get the filling texture right, you can riff endlessly and still delight guests.
Storage Tips
Keep components separate for best texture. Store cooled shells in an airtight container at room temperature for up to 48 hours; line layers with parchment to prevent sticking. The cheesecake filling should be chilled in a sealed container for up to 3 days—if it firms too much, whip briefly to restore pipeable texture. Cherry pie filling can be kept in its original can in the fridge once opened or transferred to a jar and used within 5–7 days. For longer storage, freeze the filling (without whipped topping) up to 2 months and thaw in the refrigerator overnight; fold in thawed whipped topping before using. When reheating shells to refresh crunch, warm briefly in a 300 degrees F oven for 3–4 minutes—do not microwave, which will make them chewy.
Ingredient Substitutions
Swap mascarpone for cream cheese for a milder, creamier filling—use equal weight. For a lighter option, replace half the cream cheese with full-fat Greek yogurt strained overnight; expect a tangier flavor and slightly softer set. If you prefer gluten-free, use certified gluten-free flour tortillas and GF graham crumbs; note texture may differ slightly. Instead of canned cherry pie filling, use fresh cherry compote made with fresh cherries, sugar, and a splash of lemon for brightness—cooked down to a thick syrup so it won’t make shells soggy.
Serving Suggestions
Serve these as a casual dessert at backyard barbecues or as a festive addition to a dessert bar. Garnish with toasted chopped nuts, shaved dark chocolate, or a light dusting of powdered sugar for a pretty finish. Pair with strong coffee, an espresso martini, or sparkling rosé for adults; for family-friendly events, serve with cold brew or chai. For a brunch twist, offer a build-your-own station with different pie fillings and toppings like crushed graham, sprinkles, and citrus zest.
Cultural Background
This playful mash-up blends classic American cheesecake flavors with the hand-held convenience of a taco, reflecting a broader trend of reimagining familiar desserts. While traditional cheesecake traces its roots to ancient Greece and evolved through New York styles and European cream tarts, the idea of a taco-shaped dessert is a modern American innovation inspired by food trucks and fusion cuisine. It borrows the nostalgic graham-cracker flavor of an American pie crust and packages it in a fun, portable format—perfect for casual gatherings where ease and novelty are appreciated.
Seasonal Adaptations
In summer swap cherry filing for fresh berry compote or peach preserves; in autumn try apple pie filling with a pinch of cinnamon and nutmeg in the cream cheese. For winter holidays, fold a teaspoon of pumpkin pie spice into the filling and top with warm spiced pear compote. For spring celebrations lighten the filling with lemon zest and top with strawberry-basil compote for a bright, garden-fresh option.
Meal Prep Tips
Make shells up to 48 hours ahead and store airtight. Prepare the cream cheese base a day ahead and chill; fold in whipped topping just before piping to maintain lightness. Transfer filling to a piping bag and refrigerate overnight; before piping, let sit 10 minutes at room temperature so it relaxes. For large events, set up an assembly station with shells on one tray, filling in pastry bags, and toppings in small bowls so guests can customize their own tacos quickly.
These cheesecake tacos are a joyful, simple way to present a classic flavor in a playful format. Whether you assemble them for a quick family treat or a festive dessert spread, they invite creativity and are guaranteed to disappear fast. Try them once and I bet you will be making them again for every party on your calendar.
Pro Tips
Warm the butter slightly so it spreads easily and the graham crumbs adhere evenly to the tortillas.
Bring cream cheese to room temperature before mixing to avoid lumps and ensure a silky filling.
Keep shells and filling separate until serving to maintain maximum crunch; fill just before guests arrive.
This nourishing cheesecake tacos recipe is sure to be a staple in your kitchen. Enjoy every moist, high protein slice — it is perfect for breakfast or as a wholesome snack any time.
FAQs about Recipes
Can I prepare these ahead of time?
Yes. Assemble just before serving for the crispiest shells. If you must prepare ahead, store shells and filling separately and combine within an hour of serving.
What size tortillas should I use?
Use 6-inch street taco tortillas or cut larger tortillas down to size with a round cookie cutter; be gentle while shaping to avoid cracks.
Tags
Cheesecake Tacos
This Cheesecake Tacos recipe makes perfectly juicy, tender, and flavorful steak every time! Serve with potatoes and a side salad for an unforgettable dinner in under 30 minutes.
Ingredients
For the Taco Shells
For the Filling
Instructions
Preheat and prepare coating
Preheat oven to 400 degrees F. In a shallow bowl combine graham cracker crumbs and granulated sugar. Arrange workspace for quick assembly so buttered tortillas can be crumb-coated while butter is warm.
Prevent bubbles and butter tortillas
Lightly pierce tortillas 6–7 times with a fork to vent steam and prevent air pockets. Brush both sides evenly with melted butter so crumbs adhere and shells brown uniformly.
Coat and shape
Press each buttered tortilla into graham crumb mixture until both sides are coated. Flip a metal cupcake pan upside down, fold each tortilla and nestle between inverted cups to hold taco shape during baking.
Bake shells
Bake for 10–11 minutes until edges are golden and shells feel crisp. Remove from oven and allow to cool in the pan so they retain their shape; ensure complete cooling before filling.
Blend filling
Beat softened cream cheese with powdered sugar and vanilla until smooth, then fold in whipped topping until light and fluffy. Chill at least 30 minutes so the mixture firms for piping.
Assemble and top
Pipe chilled filling into cooled shells and top each taco with 3–4 cherries and a spoonful of syrup from the cherry pie filling. Serve immediately for best texture.
Last Step: Please leave a rating and comment letting us know how you liked this recipe! This helps our business to thrive and continue providing free, high-quality recipes for you.
Nutrition
Did You Make This?
Leave a comment & rating below or tag
@silksavor on social media!
Categories:
You might also like...

Parmesan Herb Crusted Salmon
Tender baked salmon crowned with a garlicky Parmesan herb crust, bright lemon, and buttery crunch. Simple to make, stunning to serve, and irresistibly flavorful.

Caramel Apple Cheesecake Bars
Buttery graham crust, silky cheesecake, and cinnamon-kissed apples under a crunchy crumb, finished with glossy caramel. A fall crowd-pleaser you will crave.

Homemade Green Bean Casserole
Tender green beans in silky mushroom cream, crowned with crispy onions. A comforting holiday side made entirely from scratch that always disappears fast.
Did You Make This?
Leave a comment & rating below or tag @silksavor on social media!
Rate This Recipe
Share This Recipe
Enjoyed this recipe? Share it with friends and family, and don't forget to leave a review!
Comments (1)
This recipe looks amazing! Can't wait to try it.
Comments are stored locally in your browser. Server comments are displayed alongside your local comments.

Hi, I'm Julia!
What's Popular

30-Minute Meals!
Join to receive our email series which contains a round-up of some of our quick and easy family favorite recipes.