
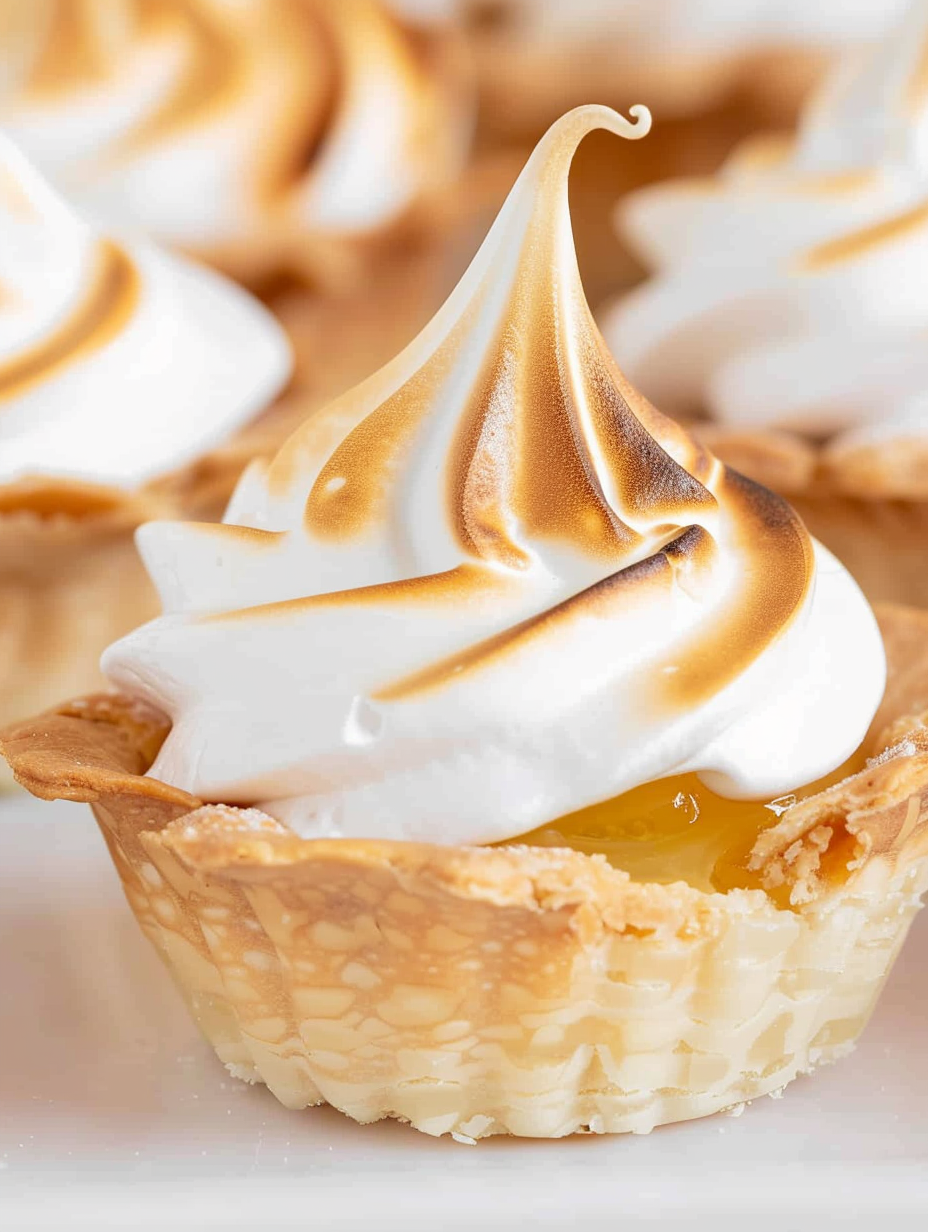
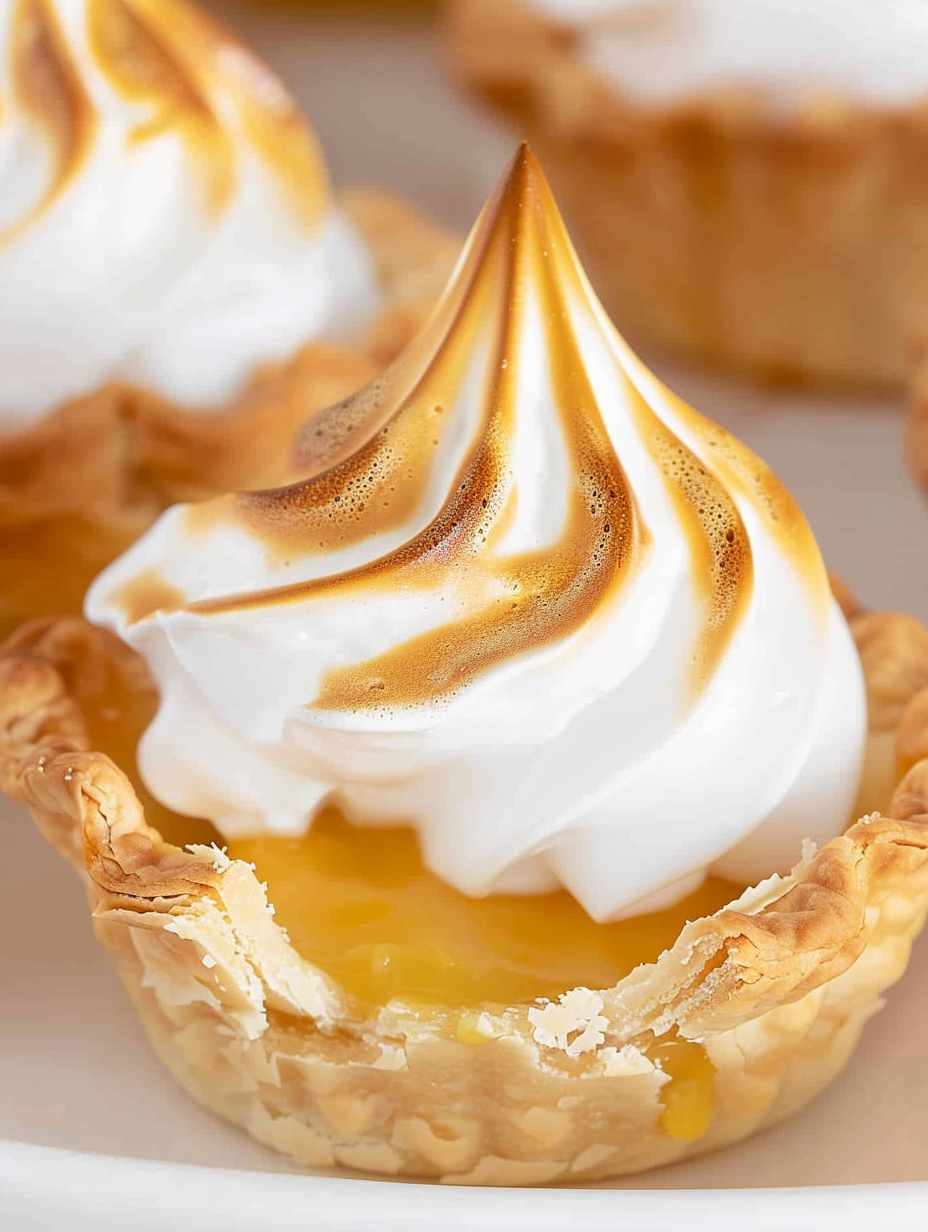
Mini Lemon Meringue Pies

Tiny buttery shells filled with tangy lemon curd and crowned with cloud-like toasted meringue—perfect for parties, make-ahead desserts, and bright summer gatherings.
Why You'll Love This Recipe
- These miniature pies are ready in under an hour using pantry staples and two store-bought pie crusts, making them perfect for last-minute entertaining and busy schedules.
- The lemon curd provides bright, tangy flavor while the meringue adds an airy sweetness and show-stopping presentation when toasted.
- They are easily scaled: make one 9-inch version or 20 mini bites from the same method, so you can adapt to the occasion without extra fuss.
- Hands-on time is short; most of the work is shaping and baking the shells, so they are great for teaching kids basic baking skills safely with supervision.
- Make-ahead friendly: bake and freeze the shells, or assemble and refrigerate filled bites for a few hours before toasting the meringue.
- Accessible ingredients and minimal equipment mean this delivers professional-looking results without complicated techniques.
I remember pulling these from the oven on a warm afternoon and watching everyone hover, waiting for the meringue to cool a bit before tasting. The combination of tart lemon and light toasted meringue always sparks the same conversation: who will be brave enough to use the torch. My family loves the theatrical finish and I love that the method lets me make a crowd-pleasing plate with little stress.
Ingredients
- Pie crust: Two store-bought 9-inch pie crusts, refrigerated. Look for brands labeled all-butter or all-vegetable shortening depending on preference; a flaky, rolled crust like Pillsbury or a high-quality refrigerated butter crust provides the best texture when shaped into mini shells.
- Lemon curd: 20 ounces lemon curd (two 10-ounce jars). I often use Bonne Maman or a trusted local brand for consistent sweetness and bright lemon flavor; alternatively, use 2 cups of homemade curd if you prefer a fresher citrus tang.
- Egg whites: 4 large egg whites at room temperature. Room temperature eggs whip faster and achieve greater volume than cold ones; bring them out 20 to 30 minutes before starting.
- Cream of tartar: 1/2 teaspoon to stabilize the foam and help the meringue hold stiff peaks during piping and toasting.
- Granulated sugar: 1 cup. Add slowly while whipping to dissolve fully and produce a glossy, stiff meringue.
Instructions
Prepare the crusts: Remove the pie crusts from the refrigerator and let them sit at room temperature for about 15 minutes so they relax and are easier to roll. Using a round cookie cutter slightly larger than your mini muffin tin wells, cut circles from the dough. Gently press each circle into the mini muffin tin, shaping with your fingers to create even walls and a small well in the center. Dock lightly with a fork if the dough bubbles up during baking. Bake the shells: Bake the shells according to package directions or at 375 degrees Fahrenheit until they are lightly golden, about 10 to 12 minutes depending on your oven and the thickness of the crust. Rotate the pan once halfway through for even color. Allow them to cool completely on a wire rack; if the shells steam while warm, the curd will weaken the meringue structure later. Fill with lemon curd: Once the shells are fully cooled, spoon or pipe lemon curd into each shell to the top. Using a piping bag or a Ziploc bag with the corner snipped gives cleaner results and prevents overfilling. Set the filled shells aside while you prepare the meringue. Whip the meringue: In the bowl of a stand mixer fitted with the whisk attachment, add room-temperature egg whites and beat on medium-high until foamy and soft peaks begin to form, about one minute. Add the cream of tartar, then with the mixer on high, add the granulated sugar one tablespoon at a time. Continue beating until the meringue is glossy and forms stiff peaks, which can take 5 to 10 minutes. Stop as soon as stiff peaks appear to avoid overbeating, which causes weeping. Pipe and toast: Transfer the meringue to a piping bag fitted with a large star tip and pipe decorative swirls over each lemon curd-filled shell. Preheat the broiler on high and place the mini muffin pan under the broiler until the meringue is evenly toasted, about 1 to 2 minutes. Watch carefully to prevent burning. Alternatively, use a kitchen torch for more control and a deeper caramelized finish. Cool and serve: Allow the browned meringue to rest for a few minutes to settle. Transfer the mini pies to a serving platter and enjoy at room temperature; refrigerate any leftovers within two hours.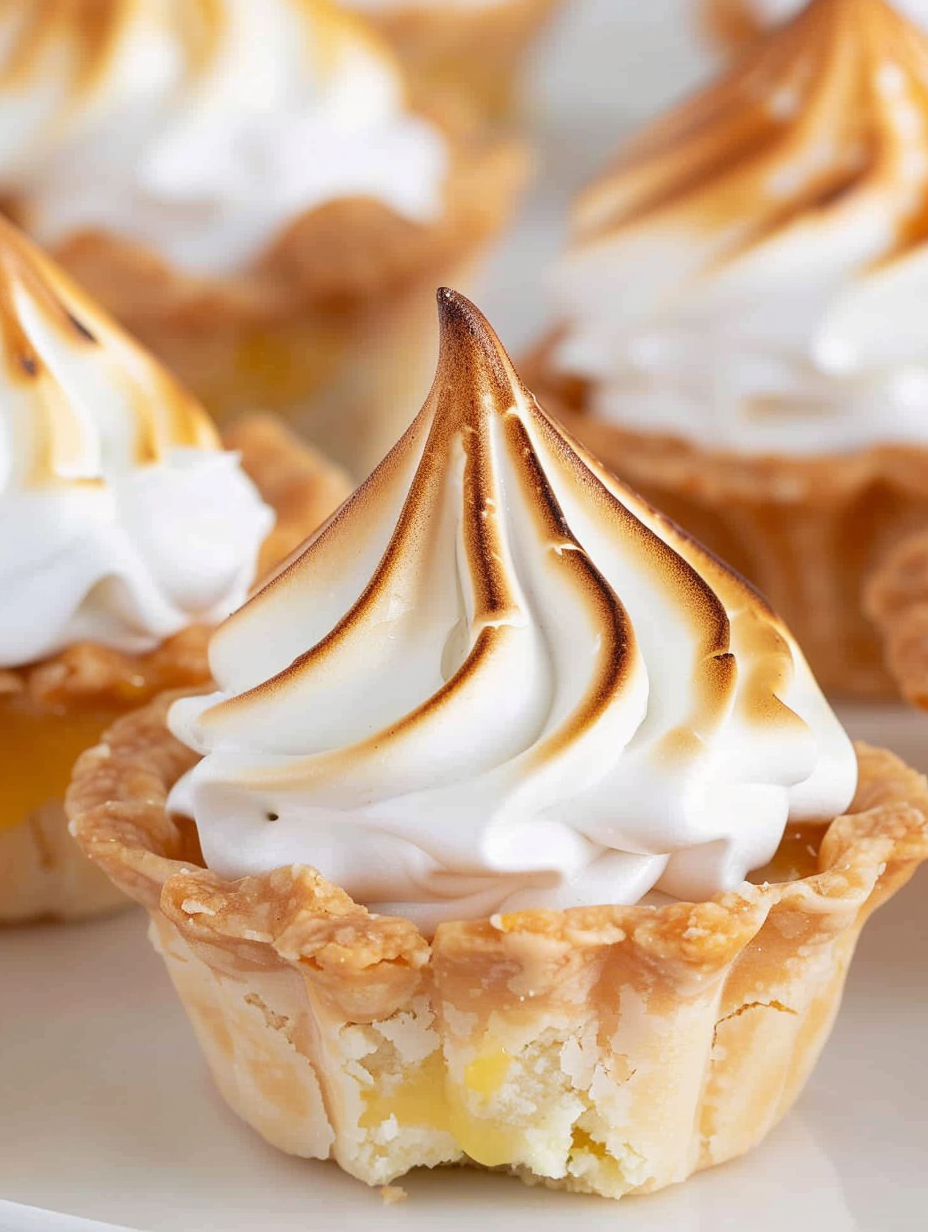
You Must Know
- These mini pies hold for about 24 hours at room temperature once the meringue is browned; refrigerate beyond that for up to 2 days.
- They freeze well if you make and freeze the baked shells only; fill and finish meringue after thawing for best texture.
- High in sugar and moderate in fat; each bite is about 214 calories, so they’re a rich but perfectly sized treat.
- Egg allergy warning: this contains egg whites; consider a meringue alternative for egg-free diets.
My favorite aspect of these small pies is how effortlessly they bring a sense of occasion. I often make them for summer graduations and tea parties where guests enjoy a curated selection of small desserts. One memorable picnic involved three dozen of these stacked on a tiered tray, and they were gone within twenty minutes. The toasted meringue always prompts comments and a few requests for seconds, which is the best kind of feedback a dessert can get.
Storage Tips
Store assembled pies in a single layer in the refrigerator covered loosely with plastic wrap for up to 48 hours. If you need to keep them longer, freeze only the baked, cooled shells in a freezer-safe bag for up to three months; thaw in the refrigerator, fill with curd, and pipe fresh meringue before toasting. For transport, pack the mini pies on a flat tray with a light cover and keep them cool; avoid stacking to preserve the meringue peaks. Reheat briefly under a warm broiler or with a kitchen torch for a freshly browned finish.
Ingredient Substitutions
If you prefer a lighter base, substitute a graham cracker crust pressed into the mini tins, using roughly 1 1/2 cups of crumbs mixed with 5 tablespoons of melted butter. For a dairy-free option, choose a dairy-free refrigerated crust and a dairy-free lemon curd. To reduce sugar slightly, use 3/4 cup of sugar in the meringue—note the peaks may be less glossy and slightly softer. For a fresher curd, make 2 cups of homemade lemon curd using egg yolks and butter; the method changes the timeline but elevates the citrus brightness.
Serving Suggestions
Present these on a tiered dessert stand for formal events or on a rustic wooden board for casual gatherings. Garnish each pie with a thin lemon twist, a dusting of finely grated lemon zest, or a tiny edible flower. They pair beautifully with lightly sweetened tea, sparkling wine, or a dessert wine like Moscato. For a brunch buffet, place them alongside fresh berries and a yogurt parfait for a balance of textures and temperatures.
Cultural Background
Lemon meringue has roots in European citrus desserts and gained wide popularity in American kitchens through mid-20th century cookbooks. The classic large pie evolved from custard and tart traditions, and the meringue topping became a hallmark of showy, celebratory desserts. The mini format echoes modern trends toward portion control and bite-sized presentation, combining heritage flavors with contemporary entertaining sensibilities.
Seasonal Adaptations
In summer, brighten the curd with additional grated lemon zest or a teaspoon of limoncello folded into the curd before filling. For winter, substitute some lemon with orange for a softer citrus profile and add a pinch of ground cardamom to the crust for warmth. Holiday parties benefit from using star piping tips and festive garnishes like candied citrus slices or edible gold dust for a celebratory touch.
Meal Prep Tips
To streamline production, bake the shells a day ahead and keep them in an airtight container. Fill with curd the day you plan to serve and whip the meringue just before finishing so the topping is at its best. If making multiple batches, work assembly-line style: cut shells, bake, cool, fill, pipe, and toast. Use a Ziploc for filling and a reusable silicone piping bag for the meringue to reduce cleanup time.
These mini lemon meringue pies strike a joyful balance between old-fashioned charm and modern convenience. Whether you make them for a crowd or a quiet treat, they reward simple techniques with a memorable result—tangy, sweet, and utterly delightful.
Pro Tips
Bring egg whites to room temperature for faster whipping and greater volume.
Use a piping bag for both the lemon curd and meringue to achieve clean, uniform bites.
Add sugar slowly while whipping to ensure a glossy, stable meringue.
Cool baked shells completely before filling so the lemon curd sets properly.
If using a broiler, rotate the pan and watch closely to prevent burning.
This nourishing mini lemon meringue pies recipe is sure to be a staple in your kitchen. Enjoy every moist, high protein slice — it is perfect for breakfast or as a wholesome snack any time.
FAQs about Recipes
Can I make the shells in advance?
Yes. Bake the shells ahead and store them in an airtight container for up to 3 months in the freezer. Thaw in the refrigerator before filling and toasting the meringue.
Why use room-temperature egg whites?
Room-temperature egg whites whip faster and reach higher volume. Let eggs sit out for 20 to 30 minutes before whipping.
Is there an alternative to the broiler?
Use a kitchen torch for precise browning or the broiler for larger batches. Watch closely under the broiler to avoid burning.
Tags
Mini Lemon Meringue Pies
This Mini Lemon Meringue Pies recipe makes perfectly juicy, tender, and flavorful steak every time! Serve with potatoes and a side salad for an unforgettable dinner in under 30 minutes.
Ingredients
Pie Crust
Lemon Curd
Meringue
Instructions
Soften and cut dough
Remove pie crusts from the refrigerator and let sit at room temperature for 15 minutes so the dough relaxes. Use a round cutter slightly larger than the mini muffin tin wells to cut circles and press into tins, shaping the crusts evenly.
Bake shells
Bake according to package directions or at 375 degrees Fahrenheit until lightly golden, about 10 to 12 minutes. Rotate pan once for even color. Cool completely on a wire rack to ensure the lemon curd sets.
Fill with curd
Fill each cooled shell to the top with lemon curd using a piping bag or a spoon. Avoid overfilling so the meringue can be piped on top cleanly.
Whip meringue
In a stand mixer, beat room-temperature egg whites until foamy, add cream of tartar, then add sugar one tablespoon at a time while whipping on high until glossy stiff peaks form, about 5 to 10 minutes.
Pipe and brown
Pipe meringue over each filled shell. Brown under a high broiler for 1 to 2 minutes or use a kitchen torch to achieve an even golden finish. Watch closely to prevent burning.
Rest and serve
Let the toasted meringue rest a few minutes, then serve at room temperature. Store leftovers in the refrigerator for up to 48 hours.
Last Step: Please leave a rating and comment letting us know how you liked this recipe! This helps our business to thrive and continue providing free, high-quality recipes for you.
Nutrition
Did You Make This?
Leave a comment & rating below or tag
@silksavor on social media!
Categories:
You might also like...

Parmesan Herb Crusted Salmon
Tender baked salmon crowned with a garlicky Parmesan herb crust, bright lemon, and buttery crunch. Simple to make, stunning to serve, and irresistibly flavorful.

Caramel Apple Cheesecake Bars
Buttery graham crust, silky cheesecake, and cinnamon-kissed apples under a crunchy crumb, finished with glossy caramel. A fall crowd-pleaser you will crave.

Homemade Green Bean Casserole
Tender green beans in silky mushroom cream, crowned with crispy onions. A comforting holiday side made entirely from scratch that always disappears fast.
Did You Make This?
Leave a comment & rating below or tag @silksavor on social media!
Rate This Recipe
Share This Recipe
Enjoyed this recipe? Share it with friends and family, and don't forget to leave a review!
Comments (1)
This recipe looks amazing! Can't wait to try it.
Comments are stored locally in your browser. Server comments are displayed alongside your local comments.

Hi, I'm Julia!
What's Popular

30-Minute Meals!
Join to receive our email series which contains a round-up of some of our quick and easy family favorite recipes.