
Mini Pepper Pizzas

Quick, cheesy mini pepper pizzas made with sweet mini peppers, pizza sauce, mozzarella, and mini pepperoni—perfect for parties, snacks, or a family-friendly appetizer.
This recipe for Mini Pepper Pizzas began as a playful experiment in my kitchen the first summer I discovered a farmer's market stall overflowing with fat mini sweet peppers. I wanted something fun, colorful, and handheld for a casual get-together, and stuffing pepper halves with classic pizza flavors delivered exactly that—bright, crunchy pepper, warm bubbly cheese, and a salty pop from tiny pepperoni that feels indulgent without being heavy. The combination is simple, fast, and always prompts a round of delighted, surprised smiles from guests who expect chips or sliders but receive something fresher and more vibrant.
I make these whenever I need a quick tray of party bites or an easy after-school snack. They come together in under 20 minutes and travel well to potlucks when kept warm in an insulated carrier. The texture is what sold my family: the pepper still has a satisfying snap, the melted mozzarella stretches like a tiny pizza, and the concentrated flavor of pizza sauce in a pepper nook packs a punch that few other finger foods match. These have become my go-to when I want something impressive with minimal effort, and they’re one of the few things that even my pickiest niece will happily devour.
Why You'll Love This Recipe
- Ready in under 20 minutes from start to finish—perfect for last-minute parties or fast weeknight snacks.
- Uses pantry staples: pizza sauce, shredded mozzarella, and mini pepperoni—easy to keep on hand for impromptu gatherings.
- Bright, colorful presentation with the pepper stem left on for a pretty, easy-to-grab bite that’s both attractive and practical.
- Low-carb and naturally gluten-free when you choose compliant pizza sauce and pepperoni, making it adaptable for many diets.
- Scalable and customizable: double or triple the quantities for crowds, or swap toppings to suit vegetarian or spicy preferences.
- Minimal cleanup—bake on parchment-lined sheet pans and serve directly from the tray for casual entertaining.
Personally, I love how these bridge healthy and indulgent—fresh produce encasing all the flavors of a classic pizza. My family treated them like a novelty the first time I served them, and now they request them for birthday snack tables and after-school grazing platters alike. They’re a simple trick to make any gathering feel intentionally curated.
Ingredients
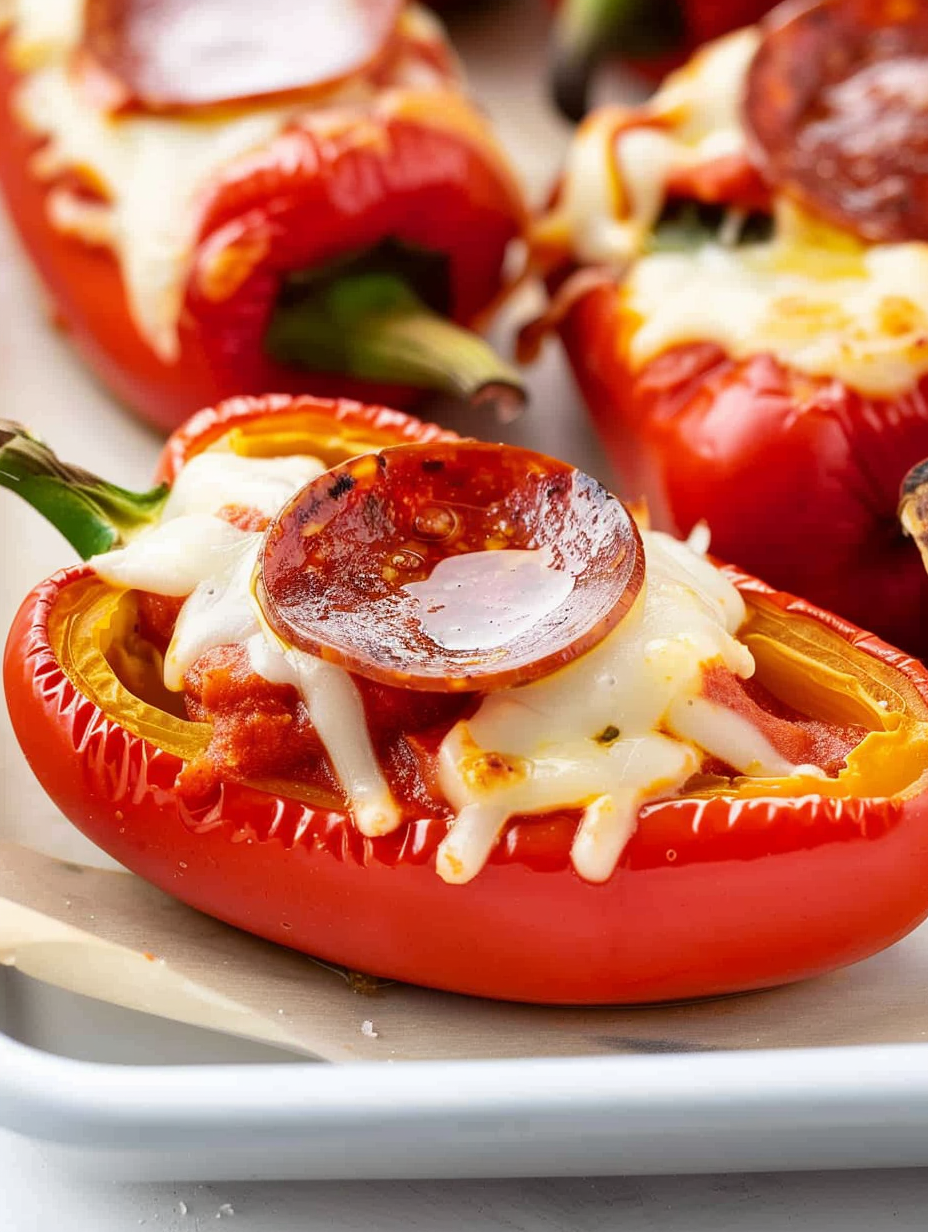
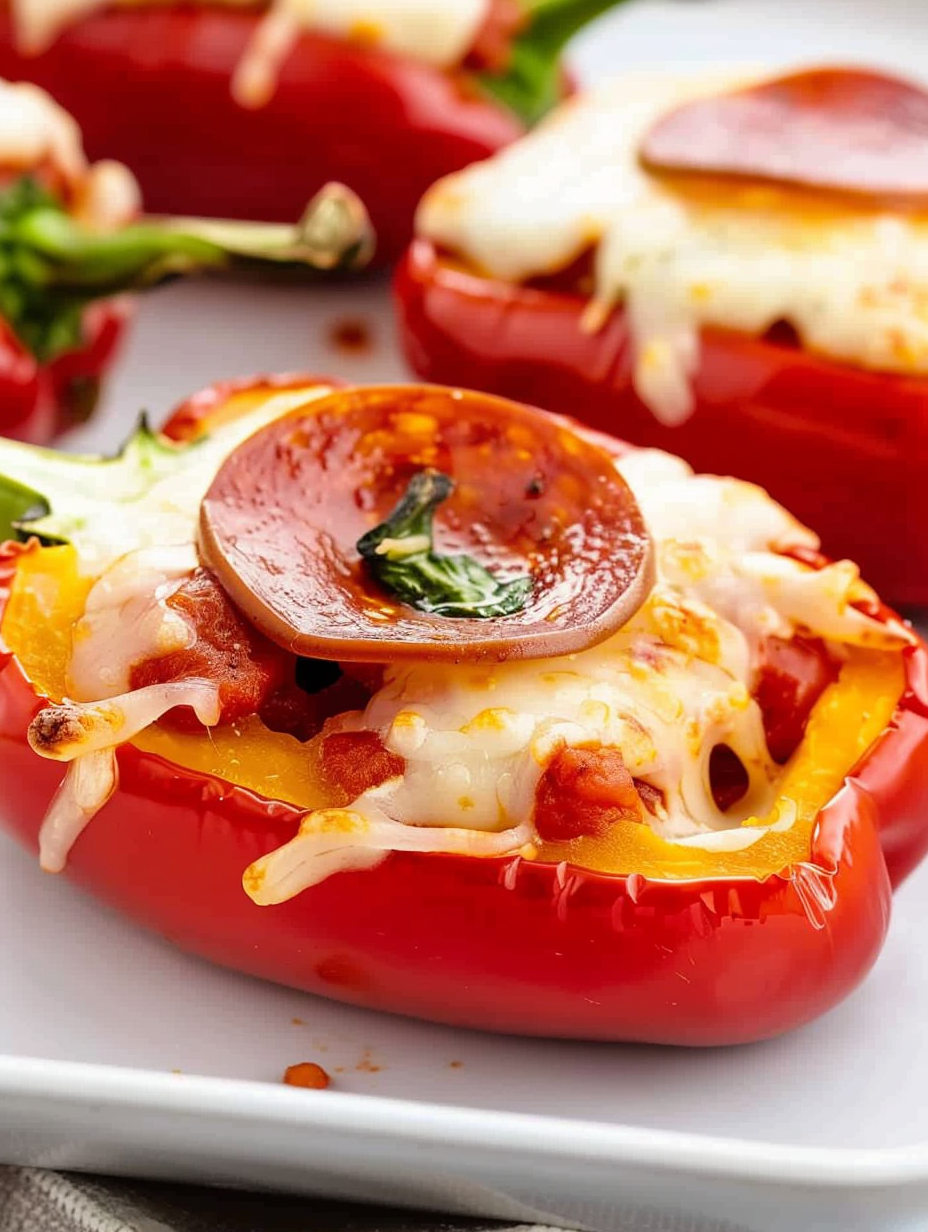
- Mini sweet peppers (12): Look for larger or 'fatter' mini peppers for easier stuffing; bright, firm skins indicate freshness. I prefer red and orange varieties for sweetness and color contrast; leave stems intact for presentation and handling.
- Pizza sauce (1 cup): Use a classic tomato-based sauce—1 tablespoon per pepper half. A mid-range brand like Rao's or a homemade marinara works well; choose a smooth sauce for easy spooning into the pepper cavities.
- Mozzarella (1 1/4 cups shredded): Freshly shredded part-skim mozzarella melts best and avoids the gummy texture pre-shredded blends sometimes develop. Measure loosely packed for about 1 1/4 cups.
- Mini pepperoni (about 74 slices): These tiny rounds provide concentrated savory flavor; plan for 3–4 per pepper half depending on size. Choose a quality cured pepperoni for the best flavor.
Instructions
Preheat and prepare:Heat the oven to 425°F. Line a baking sheet with parchment paper so the peppers don't stick and the cheese is easy to remove. Position a rack in the center of the oven for even browning. This high, dry heat encourages the cheese to bubble and the pepper edges to char slightly without collapsing.Halve the peppers:Slice each mini pepper lengthwise into halves, about 1/2-inch thick, keeping the stem intact for presentation. Use a small spoon to remove seeds and the white membrane—this reduces bitterness and creates a smooth cavity for the sauce. Pat the interiors dry with paper towel if they look wet so the sauce and cheese adhere better.Spoon on sauce:Depending on pepper size, add 1 1/2 teaspoons up to 1/2 tablespoon (0.5 tbsp) of pizza sauce into each pepper half. Aim for a thin layer that covers the cavity without spilling—too much sauce will make reheating soggier and prevent the cheese from searing properly.Add cheese:Sprinkle 1 1/2 to 2 tablespoons of shredded mozzarella on each sauced pepper half. Freshly shredded cheese gives the best melt and glossy finish; distribute evenly so each bite has a balanced cheese-to-pepper ratio.Top with pepperoni:Place 3 to 4 mini pepperoni slices on each cheesy pepper half. For extra crispness, gently overlap them so their edges brown and cup as they bake. If you like a little extra oil and char, choose a spicier pepperoni variety.Bake until bubbly:Arrange the prepared halves on the lined baking sheet and bake for 8 to 10 minutes, watching closely at the 8-minute mark. You want the cheese melted and bubbling with light golden spots; if your oven runs hot, remove them at the lower end to keep peppers crisp.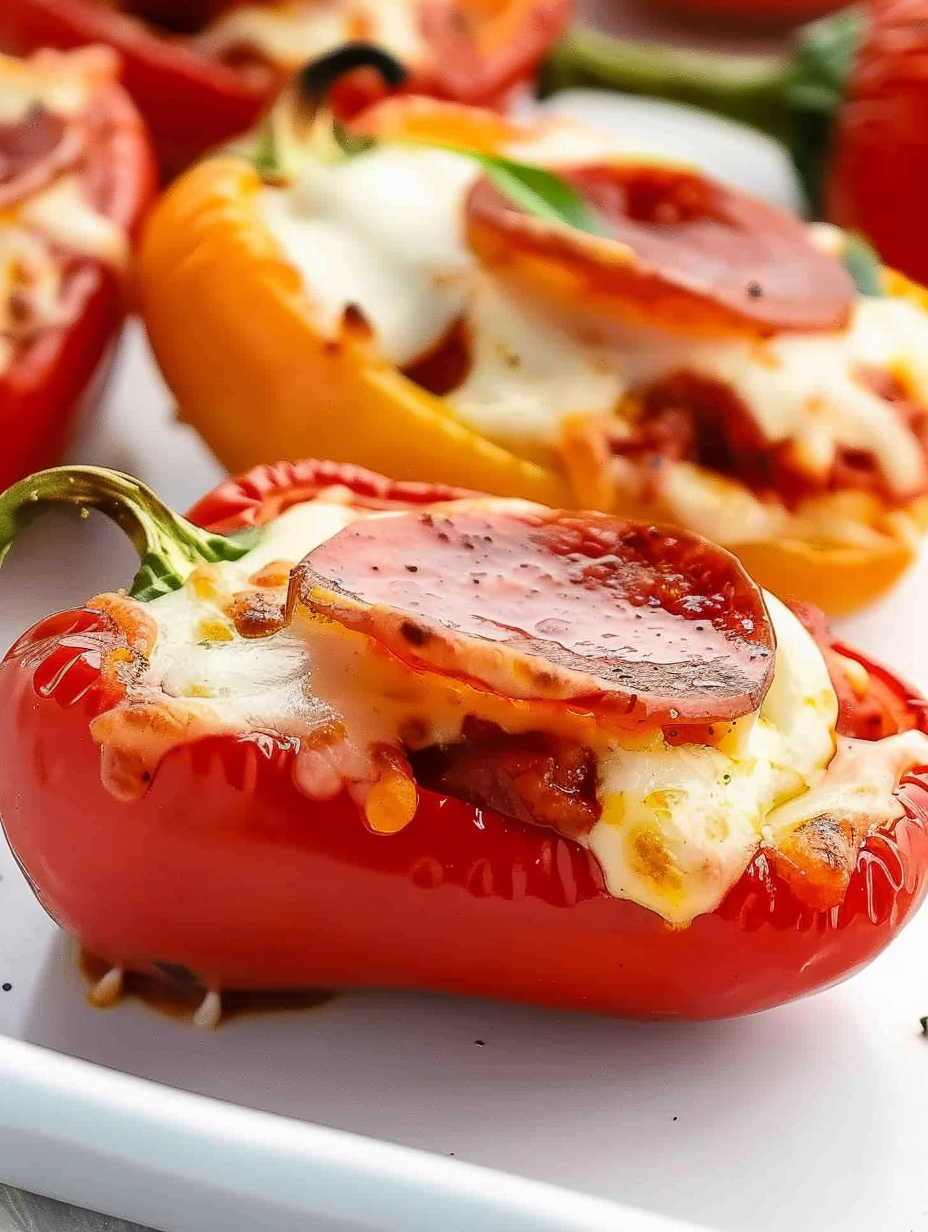
You Must Know
- These hold their texture best when baked only until the cheese bubbles—8 to 10 minutes at 425°F—overbaking softens the pepper too much.
- Store leftovers refrigerated in an airtight container for up to 3 days; reheat in a 350°F oven for 6–8 minutes to restore melted cheese and snap.
- Nutrition note: one mini pepper pizza is approximately 109 calories with about 5 g protein and 8 g fat—an easy, portion-controlled bite when you're watching intake.
- Freeze assembled, unbaked halves on a tray for up to 2 months; bake from frozen, adding a few extra minutes until cheese bubbles.
I love how versatile these bites are: a last-minute crowd pleaser for summer patios, a lunchbox surprise, or a game-day finger food. My sister once packed a tray for a picnic and the peppers were the star—guests appreciated something lighter than chips but still decadently pizza-flavored. Small touches—freshly shredded cheese, a quality sauce, and properly dried pepper interiors—make all the difference.
Storage Tips
Cool any leftover pieces to room temperature no longer than two hours, then store in a single layer in an airtight container to avoid soggy bottoms. In the refrigerator they'll keep well for up to three days. For longer storage, freeze assembled, unbaked halves on a sheet tray until solid, then transfer to a freezer-safe bag for up to two months. Reheat refrigerated leftovers in a 350°F oven for 6–8 minutes to regain crispness; frozen items can be baked at 375°F for 12–15 minutes or until heated through and cheese is bubbly.
Ingredient Substitutions
To make these vegetarian-friendly, swap mini pepperoni for sliced olives, diced roasted mushrooms, or plant-based pepperoni rounds—adjust quantities to 3–4 small pieces per pepper. For dairy-free diets, use a high-quality shredded vegan mozzarella and verify your pizza sauce is free of dairy additives. If you prefer extra protein, add a sprinkle of cooked, crumbled Italian sausage or diced rotisserie chicken; reduce cheese slightly so the peppers don't overflow. For lower sodium, choose low-sodium pizza sauce and turkey pepperoni or omit cured meats entirely.
Serving Suggestions
Serve these warm on a large platter garnished with torn fresh basil and a light drizzle of extra-virgin olive oil for a polished look. They pair beautifully with a crisp green salad, simple marinated olives, or a bowl of mixed nuts for variety. For a party, offer a build-your-own toppings station—different cheeses, spicy pepperoni, sliced banana peppers, and red pepper flakes—so guests can customize halves before baking. They also work as a playful starter before a full pizza dinner.
Cultural Background
These bites are a playful, Americanized riff on classic pizza flavors, using mini sweet peppers as an edible vessel rather than dough. While not rooted in a traditional regional cuisine, they reflect a modern approach to finger foods that values fresh produce and portability—think antipasti meets party appetizer. The concept echoes Mediterranean tapas traditions where small, shareable plates spotlight bold flavors, but the topping combination and speed of preparation align with contemporary American entertaining, where convenience meets comfort-food nostalgia.
Seasonal Adaptations
In summer, use the sweetest summer-grown mini peppers for the juiciest, most colorful bites; add fresh cherry tomatoes or summer basil to the topping lineup. In cooler months, choose heartier roasted red peppers and swap pepperoni for oven-roasted mushrooms or caramelized onions for a cozy variation. For holiday gatherings, add a sprinkle of finely chopped roasted chestnuts with creamy ricotta under the cheese for a seasonal twist. Adjust baking time slightly if peppers are roasted beforehand, since softer peppers need less oven time.
Meal Prep Tips
To streamline for busy weeks, halve and seed all peppers ahead of time and keep them refrigerated in a sealed container for up to two days. Pre-shred your mozzarella and portion sauce into tablespoon-sized dollops on a parchment-lined tray; cover tightly. On the day you plan to serve, top and bake straight from the fridge. If assembling for freezing, freeze on a tray first to preserve shape, then bag. Label with date and bake from frozen as noted above for an easy hot snack anytime.
These mini pepper pizzas have become a small obsession in my household because they balance freshness and comfort so well. They’re quick to prepare, endlessly adaptable, and always received with enthusiasm—whether at a kid’s birthday or a casual weeknight dinner. Try them once and you’ll find reasons to make them often.
Pro Tips
Use freshly shredded mozzarella for the best melt and texture; pre-shredded cheese often contains anti-caking agents that affect melting.
Dry the pepper interiors with a paper towel after seeding to prevent excess moisture from diluting the sauce and making the bottoms soggy.
Check at the lower end of the baking time—8 minutes at 425°F—because oven temperatures vary and overbaking softens the peppers.
This nourishing mini pepper pizzas recipe is sure to be a staple in your kitchen. Enjoy every moist, high protein slice — it is perfect for breakfast or as a wholesome snack any time.
FAQs about Recipes
Can I freeze these before baking?
Assemble, freeze on a tray until solid, then transfer to a freezer bag for up to 2 months. Bake from frozen at 375°F for 12–15 minutes or until heated through.
How long do leftovers last?
Yes—store in the refrigerator in an airtight container for up to 3 days. Reheat in a 350°F oven for 6–8 minutes to restore crispness.
Tags
Mini Pepper Pizzas
This Mini Pepper Pizzas recipe makes perfectly juicy, tender, and flavorful steak every time! Serve with potatoes and a side salad for an unforgettable dinner in under 30 minutes.
Ingredients
Peppers
Sauce
Cheese
Toppings
Instructions
Preheat and prepare
Preheat the oven to 425°F and line a baking sheet with parchment paper. Position a rack in the center for even heat distribution.
Halve and seed peppers
Slice each mini pepper lengthwise into halves, keeping stems intact. Remove seeds and membrane, and pat the interiors dry so sauce adheres.
Add sauce
Spoon 1 1/2 teaspoons up to 1/2 tablespoon of pizza sauce into each pepper half, depending on size. Aim for a thin, even layer.
Top with cheese
Sprinkle 1 1/2 to 2 tablespoons of shredded mozzarella on each sauced pepper half for a balanced cheese-to-pepper ratio.
Add pepperoni
Place 3 to 4 mini pepperoni slices on each cheese-topped half, overlapping slightly for crispy edges as they bake.
Bake until bubbly
Bake for 8 to 10 minutes until cheese is melted and bubbly with light golden spots. Remove at the lower end if your oven runs hot.
Serve warm
Allow to cool briefly and serve immediately while warm. Garnish with torn basil or a light drizzle of olive oil if desired.
Last Step: Please leave a rating and comment letting us know how you liked this recipe! This helps our business to thrive and continue providing free, high-quality recipes for you.
Nutrition
Did You Make This?
Leave a comment & rating below or tag
@silksavor on social media!
Categories:
You might also like...

Parmesan Herb Crusted Salmon
Tender baked salmon crowned with a garlicky Parmesan herb crust, bright lemon, and buttery crunch. Simple to make, stunning to serve, and irresistibly flavorful.

Caramel Apple Cheesecake Bars
Buttery graham crust, silky cheesecake, and cinnamon-kissed apples under a crunchy crumb, finished with glossy caramel. A fall crowd-pleaser you will crave.

Homemade Green Bean Casserole
Tender green beans in silky mushroom cream, crowned with crispy onions. A comforting holiday side made entirely from scratch that always disappears fast.
Did You Make This?
Leave a comment & rating below or tag @silksavor on social media!
Rate This Recipe
Share This Recipe
Enjoyed this recipe? Share it with friends and family, and don't forget to leave a review!
Comments (1)
This recipe looks amazing! Can't wait to try it.
Comments are stored locally in your browser. Server comments are displayed alongside your local comments.

Hi, I'm Julia!
What's Popular

30-Minute Meals!
Join to receive our email series which contains a round-up of some of our quick and easy family favorite recipes.